I am looking for a diagram of the angle of the wrist throughout the sculling stroke. I am being told that the wrist should always be in line with the forearm and not ‘cock’. However on all videos I study wrists cock as the blade is moved away from the body. Can you help clearly clarify with a pictorial explanation if possible?
 Sculling finish wrist position
Well that’s a great question because as you clearly say the “ideal” is not what most people row!
Here’s the page of explanation about the finish from our series “Rowing Coach” on the Rowperfect website
Also read the page about grip – which has photos for sweep and sculling
You can get to all the other ones from the top menu under “Rowing Coach”
However, I recommend the British Rowing Technique slides which Rosie Mayglothling presented at our seminar and are available as a free download in the Rowperfect shop.
There are great photos and summary text which you can use.
Let us know how you get on.


This Post Has 5 Comments
The trouble with all of this is the word ‘grip’. Hold your blade handle loosely and use your hands as a hook not a grip. So often the words we use create the wrong action….hooks not grips…
Excellent question and one that highlights one of the biggest issues in British amateur level rowing coaching. Namely coaching rowers to row in a way that is demonstrably not the way elite, or even effective senior athletes move the boat. Often it will not be the way the coach moves the boat. So the next question that needs to be asked is why are such statements propagated?
In answer to your question, when a sculler approaches the catch the blade handles should be held between the first bone and the third bone of the fingers, with the back of the hand flat and level with the wrist. This allows the sculler to ‘square’ the blade simply by closing their fist, leaving the the wrist flat at the catch whilst the legs apply power. If at this point there is any angle on the wrist the blade will twist on the oar lock and a crab will be caught.
However it is a tricky task for most people to feather the blade in the reverse of this motion, ie the partial opening of the fist, as this requires one part of the fingers to grip the blade whilst the rest of the hand opens. In order to facilitate the feather many rowers do cock their wrists back, then carry the blade forward on the recovery as described in paragraph two.
so please continue to cock your wrists back at the moment of the finish before transitioning in the arms away motion to the prescribed flat wrist position. What ever you do never take the catch with a bent wrist.
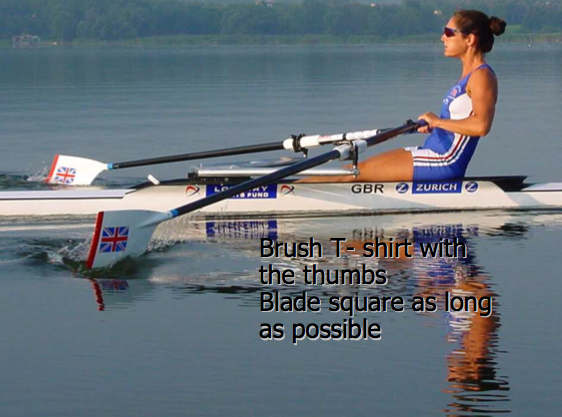
The main key to sculling with straight wrists, is the outward pressure that the thumbs maintain both during the power phase and the recovery. The buttons are kept out against the gate, which also helps to balance the boat.
The hand can then be rested on top of the handle and does not grip the handle at all. During the recovery the handle is under the first joint of the fingers. As you approach the catch the fingers are rolled forward over the handle turning the blade to square. With a light grip the sleeve will click over naturally to the correct position in the gate to take the entry, if you grip the scull too hard you will determine where the sleeve locates at the catch and this may not be in the square position.
Once square, the handle will be between the second and third finger joints and the first two finger bones will be hooked over the handle to allow the power connection with the handle. The handle SHOULD NOT be near the palm of the hand. This position with straight wrists is maintained until the thumbs almost touch the vest.
The hands, still on top of the handle, then push down to release the sculls from the water. As the arms and hands move away from the body the fingers draw back across the handle allowing it to roll out to the first joint of the fingers and in the process, feather.
Please do not coach ‘cock your wrists back at the finish’, since this releases the pressure on the blades early as they start to feather in the water and does not create a strong square finish to the stroke.
This video may help you understand the concept: http://www.youtube.com/watch?v=ixapqW5qxIk
I have a habit of letting the oar collar slip slightly loose from the rigger on stroke side, despite applying thumb pressure. I have not been able to correct this despite all attempts. I am wondering if it may be connected to a different problem on bow side, where I have a habit of rowing too deep, i.e. lifting the oar too high, in an arc. Could my shoulder alignment somehow be causing both problems? Any drills you can suggest? Thanks for all help!
Paul – to be honest, without a video of your sculling, I’d be hard-pressed to diagnose the ’cause’ and relating it to your bow side deep diving oar…. sorry.
As far as drills go – here are a couple to try out.
1 – in your single. Row square blades with one oar at a time – going round in a circle. Leave the other oar flat on the water. Concentrate on correct depth, correct hand placement on the handle grip and correct pressure on the thumb. Go round three times. Then swap to the other oar, square blades and go round three times.
2 – in your single. Row feathered blades with one oar at a time – as above. Notice what helps correct both your small errors and how you can tell if you’re doing it right vs incorrectly.
3 – Scull away with both oars. Stop rowing when one or other error appears.
4 – Row with one oar as 1 & 2 above. Continue doing this until you can scull away for 30 strokes without either issue arising. Stop, pat yourself on the back.